Sunday, February 24, 2013

Microsoft details Windows 8's improved graphics performance

Microsoft has shared more details about the graphical improvements you can expect from Windows 8 this October, not least of which is DirectX 11.1 and better hardware acceleration. Previous versions of Windows focused on 3D gaming performance, but Microsoft says 2D performance is just as important, especially for Metro.
The result of Microsoft's tinkering is a 150% increase in framerate compared to Windows 7 when rendering paragraphs of text. Rendering small chunks of text like those often found on interface controls such as labels and menus has improved 131% and heading-sized text used for titles in Metro style apps has improved 336%.

Improvements have also been made to 2D geometry rendering, the core graphics technology used to render tables, charts, graphs, diagrams and other user interface elements using HTML5 and SVG technologies for Metro style apps. Framerate increases 184% for the rendering of lines right through to 438% for rectangles.
 
A new feature, Target Independent Rasterization (TIR), has been developed for DirectX 11.1 GPUs to render irregularly shaped objects, like geographical borders on a map. The advancements mean fewer CPU cycles are spent on tessellation, allowing it to pump drawing instructions to the GPU faster without influencing visual quality.

“As you can see, we've done a lot of work to enable a very fast and smoothly animated user experience in Windows 8. From new ways to measure our progress, to optimizations for mainstream uses of our graphics platform, and new hardware features, we've created the best Windows graphics platform yet," wrote Microsoft's Rob Copeland.

Loophole enables anyone to get a Windows 8 license for free

Copies of Windows 8 Pro are freely available from Microsoft’s website for anyone who wants to try out the operating system. Normally, the software would expire after 180 days, a period that is meant to allow Volume Licensing customers to automate and manage the activation process. But a loophole in the company’s Key Management System allows anyone to legitimately activate their copy of Windows 8 permanently, for free.
The goof centers around the Windows Media Center upgrade that’s being for free offered by Microsoft themselves until January 31 next year. Specifically, when entering the add-on key, Microsoft’s Key Management System will let you fully activate your copy of Windows 8 without running a validity check for the product key of the underlying system the Media Center add-on is being installed on.
To get a free Media Center key all users need to do is request it from Microsoft’s website using any email address. Once the code is in your inbox, do a search for “Add features to Windows 8” under Settings, click on it and enter the product key. Media Center will download and install, and after your system comes back from a reboot, you’ll be able to use the same upgrade product key to activate Windows.
With this your copy of Windows 8 will become fully active and 'legitimate', which you can verify in the activation window where it should read “Windows is activated” instead of “Windows is activated until…”.
The method has been confirmed to work by several news outlets. I tried it as well but upon requesting a Media Center key the site responded it will be emailed to me “within 24 hours” -- I can’t tell if the wait period is standard or if Microsoft is moving to patch the flaw by implementing a check for the underlying system.

windows 8 with new office 2013 suite

Excel, File Copy, Gaming

Comparing Windows 8 armed with the new Office 2013 suite we found that it was 10% faster when running our Excel MonteCarlo test against Windows 7 using Office 2010. Even when comparing apples to apples, with both operating systems running Excel 2010, Windows 8 is more efficient using the CPU cycles to its benefit on our MonteCarlo simulation.

The AS SSD Benchmark was used to measure the performance of the Kingston SSDNow V+ 200 256GB SSD. Here we see that Windows 8 and Windows 7 delivered virtually the same sequential read and write performance.

Despite delivering similar sequential read/write performance we found in the ISO benchmark that Windows 7 was 9% faster based on an average of three runs.

Windows 8 features a new Explorer interface for transferring files, which provides more accurate data on transfer speeds and estimated time of completion. It also stacks multiple transfer windows together. The UI is awesome, but on the performance side of things there is little difference when transferring multiple large files together or individually. Windows 8 and Windows 7 deliver similar performance in both situations.

When transferring thousands of smaller files we also found that Windows 7 and Windows 8 offer the same performance.


Finishing up we looked at gaming performance using Just Cause 2, Hard Reset and Battlefield 3. Similar to the previous 3DMark test, this relies on graphics drivers more than anything else. As you can see both operating systems provide similar performance with a very slight edge to Windows 7's advantage.

Windows 8 vs. Windows 7 Performance

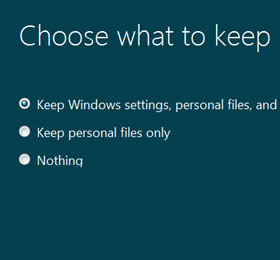
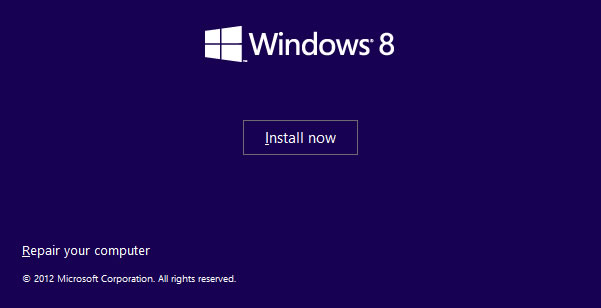
Unless you have been living under a rock, there is a good chance you have caught wind of Microsoft’s latest operating system. Those eager to see what the new OS is all about had their first chance to take a peek back in February when Microsoft released the Windows 8 Consumer Preview.
More than a million downloads took place within the first day of the preview's release, but users were in for a shock as major changes awaited them. By far the most controversial has been the replacement of the Start menu for the new Start screen, and inherently, Microsoft's decision of doing away with the Start button on desktop mode.
For the first time since Windows 95 the Start button is no longer a centerpiece of the operating system, in fact it's gone for good.
On the final version of Windows 8, clicking the bottom-left corner of the screen -- where the Start button would normally be located -- launches the Metro interface (or whatever it is they are calling it now). The new tile-based interface is radically different from anything used on a Windows desktop and resembles what we've successfully seen working on the latest iterations of Windows Phone.

However, many users seem to be struggling to get their head around it. Personally, in spite of using Windows 8 for several months, I'm still undecided if I like the new interface or not. It certainly takes some time getting used to and for that reason I'm not jumping to conclusions just yet.
My opinion aside, there are countless users that have already shunned the new interface and many of them made their thoughts heard in our recent editorial "Windows 8: Why the Start Menu's Absence is Irrelevant". Yet, while everyone loves to try and remind Microsoft about how much of a flop some previous operating systems such as ME and Vista were, and that Windows 8 will be no better, we believe the new operating system still has a lot to offer.
Microsoft's PR machine has been hard at work over the past few months, trying to explain the numerous improvements Windows 8 has received on the backend. The good news is that it shows.
Coming from the two previews and now the final release of Windows 8, the OS seems smoother than Windows 7. It has been well documented that Windows 8 starts up and shuts down faster, so that wasn’t much of a surprise. Maybe it's the inevitability of bloating an OS installation that is a couple of years old (in the case of Windows 7), but there's this sense of when you move from a hard drive to an SSD, things just appear slightly quicker. This was surprising as I had not expected to notice much of a difference for general usage.
Of course, this is merely an informal observation and we are here to back up those impressions with hard numbers (read: lots of benchmarks in the coming pages).
Back when Vista first arrived I remember comparing how it performed to XP and being extremely disappointed with the results. Vista was generally rough around the edges and that included drivers, so gaming and productivity applications were more often than not slower in the new OS.
For comparing Windows 7 and Windows 8 we will measure and test the performance of various aspects of the operating system including: boot up and shutdown times, file copying, encoding, browsing, gaming and some synthetic benchmarks. Without further ado...

Benchmarks: Boot Up, PCMark, Browser, Encoding

The following benchmarks were conducted using our high-end test system which features the Intel Core i7-3960X processor, 16GB of DDR3-1866 memory and a GeForce GTX 670 graphics card, all on the new Asrock X79 Extreme11 motherboard. The primary drive used was the Samsung Spinpoint F1 1TB, while the 
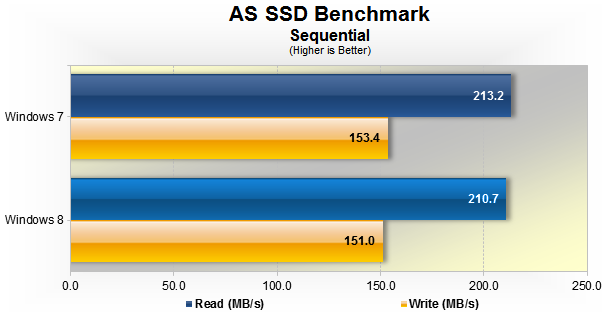
Kingston SSDNow V+ 200 256GB SSD was used for the AS SSD Benchmark and Windows Explorer tests.

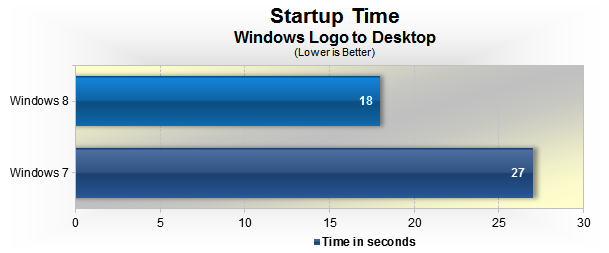
Using the Samsung Spinpoint F1 1TB HDD we saw OS boot up times reduced by 33%. Going from 27 seconds with Windows 7 to just 18 seconds with Windows 8 is obviously a significant improvement and it means SSD users will be able to load Windows 8 in a matter of a few seconds.

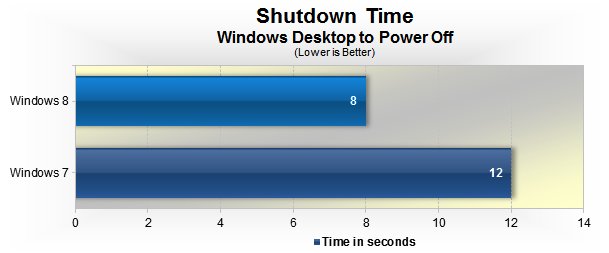
A similar improvement is seen when measuring shutdown time. Windows 8 took 8 seconds versus the 12 seconds it took an identically configured Windows 7 system.

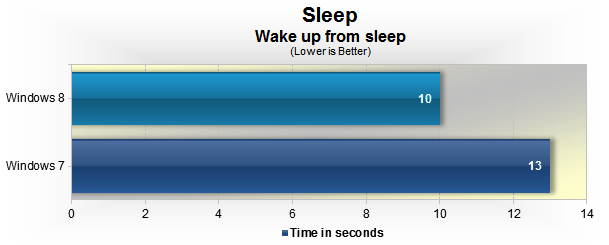
We tested wake-up from sleep times using a standard hard disk drive. Windows 8 shows a marked improvement here as well, however we still thought 10 seconds was too long. We then tested Windows 8 using our SSD and the exact same 10 second window was repeated. With <5 second wake up from sleep times being touted by today's Windows 7 laptops, we imagine the operating system detects when you are using a laptop and that there are special power saving features on a mobile system that make a difference.

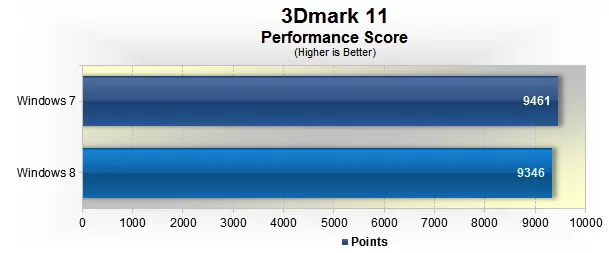
3Dmark 11 is used primarily to measure 3D graphics performance, meaning graphics card drivers play a vital role here. Still the performance was very similar on both operating systems, though the more mature Windows 7 was slightly faster.

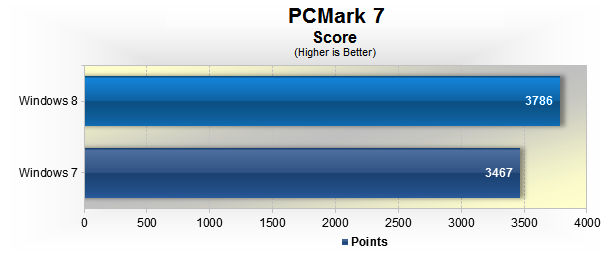
Multimedia performance is said to be another of the strengths of Windows 8, and as you can see when testing with PCmark 7, it was 9% faster than its predecessor.

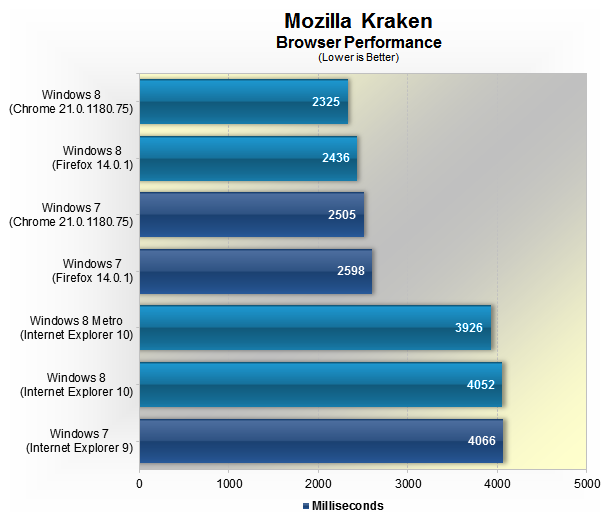
Using the Mozilla Kraken benchmark we compared the performance of Windows 7 using IE9 and Windows 8 with IE10. As you can see the desktop version of the IE10 browsers on Windows 8 delivered virtually the same performance as IE9 on Windows 7. The Metro version of IE10 was 3% faster, reducing the completion time to just 3926ms.
Update: We've added benchmarks for the latest versions of Firefox and Chrome on both operating systems. Besides beating IE to the punch on these synthetic benchmarks, the take away here is that both browsers tend to perform slightly better under Windows 8.

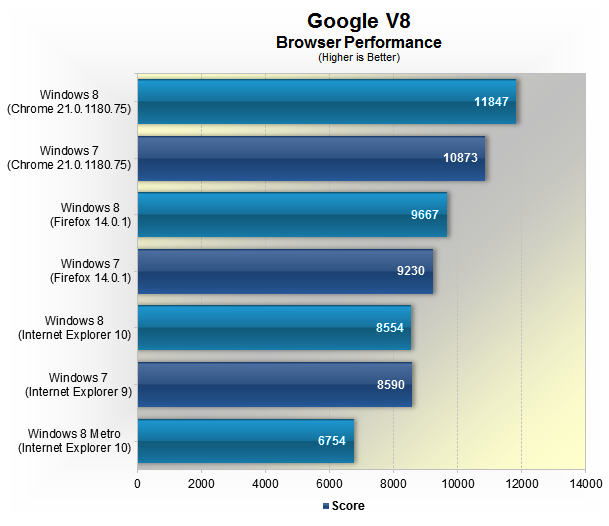
Google V8 is another browser test we used. In this case it gives a score, so the larger the number the better. Again we see that the desktop version of the IE10 browser in Windows 8 is very similar to IE9 from Windows 7. Though this time the Metro version is actually much slower, lagging behind by a 21% margin.
Chrome and Firefox take a huge lead compared to IE, and on both counts the browsers behave better running on Windows 8.

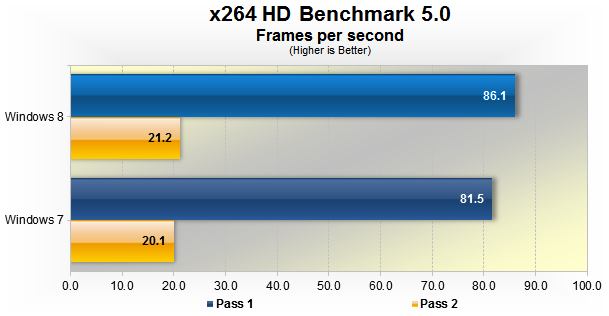
PCmark7 showed us that Windows 8 was faster than Windows 7 in multimedia type tests and this has been confirmed by the x264 HD Benchmark 5.0 which favored Microsoft’s latest operating system by a 6% margin in the first pass test.

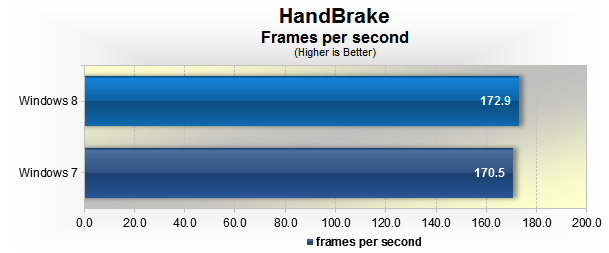
Although the margin was very small when testing with HandBrake, we still found Windows 8 to be 1.5% faster than Windows 7.

Enable Windows 7's Hidden "God Mode"

As indicated by enthusiasts around the Web, there is a simple way to access a hidden "God Mode" in Windows 7 and Vista. With a name like that, your expectations might be a little high -- and no, Windows is not secretly invincible -- but the trick is awesome nevertheless.
"God Mode" simply provides users with a centralized Control Panel for all of Windows' settings, from changing your desktop background to setting up a VPN or partitioning your hard drive. In all, there are nearly 50 categories and most have several entries.It's almost comical how simple it is to access it:
  1. Create a new folder. Anywhere is fine, I created one on my desktop.

  2. Rename the folder to: God Mode.{ED7BA470-8E54-465E-825C-99712043E01C} *Note: The "God Mode" chunk can be called anything you want.

  3. The default folder icon will change to a Control Panel icon, and you can open it to view all of the settings.
User reports suggest that it may crash Windows Vista 64-bit, so proceed with caution. For what it's worth, I've successfully used the "feature" on Windows 7 Home Premium and Ultimate 64-bit. As an additional note, having the undocumented feature disclosed all over the Web, Microsoft has decided to be more open about it admitting similar commands have been available even before Vista. They have also revealed other text strings that create similar "God Mode" folders

A List of Common Default Router IP Addresses

A List of Common Default Router IP Addresses
Here's the scenario: you are trying to fix a relative's network issues and you need to access their router's browser interface. We've all been there, fruitlessly pecking in combinations of 192.168.x.x. Unless you have every default router address tattooed on your forearm, you'll eventually encounter one that stumps you. When that happens, you can typically find the information with a simple command on Windows. Open the command prompt (Start > Run/Search for cmd) and then enter ipconfig. The address you need should be next to Default Gateway under your Local Area Connection, and it will often begin with 192.168.
If for any reason you can't retrieve the router's IP address using that method, we've compiled a brief list of popular router brands and their common default addresses. Feel free to recommend additional addresses in the comments and we'll add the information here as a handy reference resource for TechSpot members. If you're looking for an equally handy default username and password list, this PDF has tons of information for just about every router manufacturer out there. Common default usernames include variations of admin (Admin, administrator, etc.), and the password is often admin, password, or simply left blank -- needless to say, it's good practice to change these upon setup.
Router ManufacturersDefault IP Addresses
3Com192.168.1.1
Apple10.0.1.1
Asus192.168.1.1, 192.168.1.220
Belkin192.168.2.1, 10.1.1.1
Buffalo192.168.11.1
Dell192.168.1.1
D-Link192.168.0.1, 0.30, 0.50, 1.1, 10.1.1.1
Linksys192.168.0.1, 1.1
Microsoft192.168.2.1
Motorola192.168.10.1, 20.1, 30.1, 62.1, 100.1, 102.1, 1.254
MSI192.168.1.254
Netgear192.168.0.1, 0.227
Senao192.168.0.1
SpeedTouch10.0.0.138, 192.168.1.254
Trendnet192.168.0.1, 1.1, 2.1, 10.1,
U.S. Robotics192.168.1.1, 2.1, 123.254
Zyxel192.168.1.1, 2.1, 4.1, 10.1, 1.254, 10.0.0.2, 0.138

Check If Someone Is Using Your Wi-Fi

There are many reasons why you'd want to check if an unauthorized party is using your wireless network. It may be that you're experiencing a slower than normal Internet connection or you simply don't want anyone getting a free ride while you pay the bill. Of course, there are also security implications if this person can somehow access files on your network, and even legal implications if he uses your connection for piracy or other illicit activities.
Whatever the case it's better to stay on the safe side. Many of you may have already taken some basic precautions when setting up your wireless network and know your way around troubleshooting these issues. This brief guide is aimed mostly at novice users in need a hand to find out if, indeed, their Wi-Fi is being stolen.

Check the devices associated with your router
The first thing you need to do is login to your router's administrative console by typing its IP address directly into the browser address bar -- typically 192.168.0.1 or 192.168.1.1 depending on which router you have. If you don't know your router's default address check out this guide or simply go to the command prompt (Start > Run/Search for cmd) and enter ipconfig. The address you need should be next to Default Gateway under your Local Area Connection.
Alternatively, if you are on a Mac, you can find the default address by going to Network under System Preferences. It should be listed right next to "Router:" if you are using Ethernet, or by clicking on "Advanced…" and heading to the "TCP/IP" tab if you are using Wi-Fi. Next, point your browser to that address and enter your login details -- if you haven't changed the default settings it should be a combination of "admin" and "password" or blank fields. Here's a default username and password list (PDF) you might find useful, but we recommend you change this afterwards.
Once inside your router's administrative console look for a section related to connected devices or wireless status. In my old DIR-655 from D-Link it's available under Status > Wireless but you'll find it as "Attached Devices" in Netgear routers, under DHCP Clients Table on Linksys routers, "Device List" if you are using the Tomato firmware, and so on.


DHCP client list examples on D-Link and Linksys routers.

This should provide a table with the IP, MAC address and other details of every device currently connected to the router. Check that list against your gear to find any intruders. You can find out the MAC/IP address of your computers by going to the Command Prompt again and entering 'ipconfig /all'. The MAC address will be shown as the physical address. I'll let you figure it out for mobile devices like smartphones and media players since I can't possibly list all options.

Taking action
The best and simplest solution is to set up a strong password using WPA2 or WPA -- WEP is very easy to crack so avoid that if possible. There are some other methods you can use to beef up security, like switching off the SSID broadcast (which prevents it from advertising the name of your network to nearby Wi-Fi devices) or setup a filter for allowed or blocked devices by MAC address. It won't stop the most determined intruder but it will slow him down.
That should be more than enough for most users but if you need to actually track down who's been breaking into your network it's possible to pinpoint his physical location using a tool called MoocherHunter. You'll need to burn a Live CD to boot your laptop with and walk around to track down unauthorized wireless clients. According to the program's description, it detects traffic sent across the network and can find the source within 2 meters accuracy.
Needless to say, we're not suggesting you take matters into your own hands, but it might come in handy if someone is getting you in trouble with authorities using your network for illegal purposes -- or simply to have a cool story to tell.

Bonus: Profit by setting up a paid Wi-Fi hotspot
If it doesn't bother you to have someone piggybacking on your connection you might as well get something in return, right? Chillifire is a good third-party firmware alternative if you want to run a public hotspot, as it allows you to offer for-pay or free Internet access points from your consumer router. Alternatively, you can get a Fonera router, which gives you free roaming at Fon Spots worldwide in return for sharing a little bit of your WiFi at home.

Install Windows 8 From a USB Drive, Dual-boot with XP, Vista and 7

Install Windows 8 From a USB Drive, Dual-boot with XP, Vista and 7
Back when the Windows 8 Consumer Preview hit the Web, we offered a basic guide on configuring a virtual machine. With Windows 8's Release Preview available and the final version inching toward completion, we figure it's a great time to offer a similarly easy step-by-step walkthrough on installing Windows 8 with a USB drive.
If you're familiar with the process, there isn't much for you to see here, but this should serve as a quick confidence booster for anyone who hasn't installed an operating system recently.
Step One
Download Windows 8 and the Windows 7 USB/DVD tool
If you're not sure what version of Windows 8 to download, we'd recommend the 64-bit build, especially if your system is relatively modern. You can read more about the difference between 32-bit and 64-bit operating systems here and the download page linked above provides system requirements for each architecture. The short of it: Windows 8 64-bit requires an extra 1GB of RAM and 4GB of storage -- negligible for most users. Also, before you ask, the Windows 7 USB/DVD tool will work fine with Windows 8.
Step Two
Create a bootable Windows 8 USB drive
Naturally, to create a bootable USB drive, you'll have to insert one and it needs to be 4GB or larger. Install the Windows 7 USB/DVD tool. Once the utility opens, you should be able to browse for and select the Windows 8 ISO you downloaded as well as the USB drive you inserted. It's worth noting that your USB drive will be wiped, so save anything important. The process takes about five minutes depending on the speed of your drive. You'll see a message that reads "backup completed" when it's done.

Step Three
Install the Windows 8 Release Preview (key: TK8TP-9JN6P-7X7WW-RFFTV-B7QPF)
Needless to say, back up anything important before proceeding. If you plan to upgrade or overwrite your installation of Windows XP, Vista or 7, open the root directory of your USB drive in Windows Explorer and launch Setup.exe to begin. You'll get to choose between the two. Windows 7 users should have a painless upgrade as programs, Windows settings as well as user accounts and files are imported. However, Windows 8 won't save programs from Vista and it won't save programs or Windows settings from XP.

If you want to dual boot Windows 8 with your existing operating system, you'll have to install a second storage device or create a new partition. The former is relatively self-explanatory, just attach the drive and choose it during the installation process. The latter, however, requires a little more effort. Vista and 7 users can create a new partition with Windows' Disk Management application (Start > search for Disk Management). Once the application loads, you should see your operating system's drive. Follow these steps:
  • Right click the drive that you want to house Windows 8 and choose "Shrink Volume" (Windows 8 64-bit requires at least 20GB, so shrink your current partition accordingly)
  • Right click the new "Unallocated" space and create a "New Simple Volume"
  • Choose the next available drive letter and quick format the partition with NTFS (you can name the volume anything, but we'd suggest something like Windows 8 RP x64)

Windows XP users will have make partition adjustments with a third-party tool such as Partition Logic, but you'll do the same thing: shrink one volume to create another. It should be smooth sailing from here as Microsoft's installation process guides you through everything. Just boot off your Windows 8 USB drive, choose a custom installation and select your newly created partition. If you're having trouble launching the USB drive, you probably just have to put it ahead of your system drive in the BIOS (look for boot options).
If you want to get rid of Windows 8, load your primary OS and launch partition software (again, Disk Management for Vista or 7 users). Delete the Windows 8 volume and extend your remaining partition into the freshly unallocated space. Removing Windows 8 could screw up your bootloader and prevent your original OS from starting properly.

Windows 8 Boot Issues

Windows 8 Boot Issues? Try Fixing the Master Boot Record (MBR) or Boot Configuration Data (BCD)
Windows 8 received a decent amount of enhancements on the desktop side that I tend to appreciate versus running Windows 7, even if that means I get Metro standing in the middle here and there occasionally. One such area of improvement is notification management and how it handles updates and system restarts. Running the final version of the OS for a few months now, it’s been a painless affair until this past weekend.
I shut down my desktop PC with the purpose of connecting new hardware and on the way out I was prompted to “update and shutdown”. Sure, why not. I went on to install a secondary SSD for maintenance purposes and apparently that was enough for my system to refuse booting right after. I tried to backtrack to no avail.
"Reboot and select proper boot device"
I bet you have no love for the message, neither do I.

Because I had disconnected a few devices, it took me a while to narrow things down to my boot SSD, and for a second I even thought the SSD had gone forever kaput. After booting with a different drive and noting I could read all my data on the drive in question, I took a deep breath and started to troubleshoot the boot record. Once you settle on the idea that it’s not a hardware problem and you are unable to boot up, your best bet is to try to fix the MBR (Master Boot Record).
With a long history of dual booting different versions of Windows over the years, finding a corrupt MBR, boot sector, or Boot Configuration Data (BCD) is nothing new, but it took me longer than usual to come to a solution. Here are a few things you can try and hopefully get back to full speed in no time.
First of all, you will need a bootable disc or pen drive. Here’s a quick guide to accomplish that if you don’t already have one handy. Although it's not a requirement, to be on the safe side it's recommended at this point that you disconnect other storage devices from your PC and leave only the SSD/HDD that you are troubleshooting.

Booting into the Windows 8 setup, select “Repair your computer” in the bottom part of the window, then “Troubleshoot” and “Advanced options”. Here I was given a good reminder of another cool Windows 8 feature. If you have a restore point created you can go back to that working copy of the OS without losing your data. Well, I didn’t have any.

So the first thing you will want to try is the Automatic Repair.

If that fixes your boot problem, you had it easy and go on to create a restore point for another time you are out of luck. If Windows is unable to fix your issue, read on.
Go back to the Advanced options and choose the Command Prompt. Going for the next easiest way to fix the problem, enter the following four commands into the prompt:
bootrec /fixmbr
bootrec /fixboot
bootrec /scanos
bootrec /rebuildbcd

After receiving a success confirmation. Close the CMD window and restart your PC.
If you are booted into Windows, excellent! If not, let’s try one last thing. Follow the previous steps until you have landed into the Command Prompt.
Enter the “bcdedit” command. A lists of items will appear under Windows Boot Manager and under Windows Boot Loader. Look for the following items:
  • Under Windows Boot Manager, the Device item should be set to unknown.
  • Under Windows Boot Loader, the Device and os device items should be set to unknown.
Run the following three commands to correct the settings:
bcdedit /set {default} device partition=c:
bcdedit /set {default} osdevice partition=c:
bcdedit /set {bootmgr} device partition=c:
One last thing to try (though in theory, it's the repeating what we’ve done before) browse to the folder X:\Sources\Recovery and then enter “StartRep.exe” which executes another automated startup repair utility.

The Best Computer Tips and Tricks: BitTorrent

Get a Router
If your computer is connected directly to a DSL or cable modem, you might want to hold off on any file sharing. Place a router with a built-in firewall between your computer and Internet connection, and set up port forwarding, which can speed up a BitTorrent client's performance. This will help minimize the chances of someone hacking into your system.

Use Your Browser

You don't have to download a dedicated client to use BitTorrent. Point your Web browser to BitLet and type in the Torrent file's URL in the box. It's perfect for the times when you aren't at your home computer.

Use a Thumb Drive

If the Web-based BitLet's barebones nature won't cut it, you can launch the popular, full-featured BitTorrent client �µTorrent off a USB thumbdrive. Simply download the app onto a portable drive, and access �µTorrent from there.

Schedule Your Uploads and Downloads

If you are using �µTorrent, take advantage of the Scheduler feature. You can set downloads and uploads during specific times of the day when you aren't using your computer for other tasks. This ensures you allocate your Internet's bandwidth appropriately. Go to Options > Preferences > Scheduler to set it up.

Serve Files From a NAS

Some external network-attached-storage devices offer features that cater specifically to BitTorrent users. The Fantom Drives G-Force Megadisk NAS MDN1000, for example, lets you enable it for unattended BitTorrent downloads and create maximum upstream and downstream bandwidth thresholds.

Check Seeds and Peers

When you're downloading, be on the lookout for torrents with the best seed/peer ratio. The more peers trying to access a file, the slower your download will go.

The Best Computer Tips and Tricks: iTunes

On-the-fly equalizer
If you want a quick way to adjust equalizer settings, you can add an EQ column in your view options. Go to View > View Options, and check Equalizer. The EQ column will appear with pull-down menus that let you choose the appropriate EQ setting.

Right-click Options

Some of iTunes's features can be accessed via right-clicking. Use the "Get Info" option to view details about a song and the associated file and to edit any info. You can also convert the song to another file type, and download free album art from the iTunes Music Store.

Make Shuffle More Random

Sometimes iTunes repeatedly plays the same artist in shuffle mode. To make shuffle selections more random, head to the Playback pane in Preferences and drag the slider in the Smart Shuffle setting all the way to "less likely."

Stream Faster

In the Advanced pane of Preferences, you can adjust the streaming buffer size based on your Internet connection. If you are on dial-up, you can still get smooth playback by changing to a larger buffer size; you'll just have to deal with a longer wait. Those with a speedy broadband connection will want to use a smaller buffer size for quicker playback.

Parental Controls

If there's questionable content in your library that you don't want your youngsters exposed to, simply set the parental controls in Preferences (under Edit). You can also restrict what they buy from the iTunes Music Store.

Turn iTunes into a PDF Manager

If you're scratching your head over this tip (iTunes and "¦ PDFs?), read on. iTunes has PDF support because some purchases on the iTunes Store come with accompanying documentation. Thus, you can drag-and-drop PDFs in iTunes as you would songs (a book icon appears next to the file name in the library). Create a separate iTunes folder, and now you have a great way of managing your PDFs.

Back up Your Music Library to Disc

If you're worried about losing your iTunes collection, try the "Back Up to Disc" function in the File menu, which will burn your entire collection to DVD or CD. (You'll be prompted to insert another disc if you're collection is larger than one disc's capacity.) Keep in mind that this is just meant to back up your collection—the discs won't play in DVD or CD players.

Create a Separate Music Library

If you want to start a new library in iTunes without getting rid of the old one, then hold down the Shift key when launching iTunes. You'll be given the option of creating a new library.

Find Duplicate Songs

If you do a lot of downloading, then chances are you might have a few duplicates in your collection. To get rid of them, go to View > Show Duplicates, then delete the extra copies.

Change iTunes' Default Audio Format

CDs ripped to iTunes will be encoded into AAC format by default. This can be changed by going to Edit > Preferences, then clicking on the Advanced tab. Once you're there, select the Importing tab, open the dropdown menu, and choose whichever format you want your tunes encoded in.

Mouse-free Tunes

You don't need to rely on your mouse when you're in iTunes—several keyboard shortcuts can take care of most basic functions. Tapping the spacebar, for example, will pause a track. Hitting left or right will go to the previous song or move on to the next one, respectively, while holding Ctrl. And moving the up or down arrows will raise or lower the volume.

On the Move

If you want to take iTunes off your task bar and move it into the system tray, where it will be less obtrusive, then simply go to Edit > Preferences, select the Advanced tab and, under the General tab, check the box next to "Minimize iTunes window to system tray."

The Best Computer Tips and Tricks: Laptops

Make Your Own Power Plan
Windows laptops include a few preset power plans for maximizing battery life, but you can also customize your operating system's power-management features (in Windows XP, under Power Options in the Control Panel; in Vista, under Mobile PC in the Control Panel). Setting aggressive targets for when the display turns off and when the machine goes into sleep or hibernate mode will help your battery last longer.

Limit Your Connection

When you aren't actively using your notebook's Wi-Fi, Bluetooth, WWAN, or other wireless connections, turn the radios off (via the hard switch, if your PC has one, or using the appropriate utility), so they don't run down the battery while they keep searching for a signal. Also, use USB-attached devices sparingly while you're mobile.

Track it down

Thousands of laptops are reported stolen every year. Our advice? Prepare for the worst by investing in tracking software like Absolute Software's Lojack for Laptops, CyberAngel Security, or the free TheLaptopLock. These utilities can pinpoint a registered notebook's location once it connects to the Web, increasing your chances of recovering your system.

Dim the display

A laptop's biggest battery-life-sucking component is its LCD display. To eke out more juice when you're off the plug, turn down your panel's brightness to the lowest level your eyes can stand. Most notebooks have a Function key combo—or even a dedicated hot key—for a quick crank-down. (You can also adjust brightness in Display Settings under Control Panel.)

Keep It Cool

Thanks to their small, cramped cases and tiny vents, laptops are prone to overheating. Unfortunately, using your notebook on your lap—or on top of a blanket that protects your lap from your scalding-hot notebook—can seriously stifle ventilation and make matters worse. To help keep temperatures in check, opt for a lap desk or a laptop cooling pad that won't conduct heat or block your laptop's vents.

Back Up Everything

Constant movement puts computer components at risk, and because of their portability, laptops suffer a lot more wear and tear than desktops. All of that on-the-go use increases the risk of hard drive failure, so make sure you back up the data on your laptop to an external hard drive, thumb drive, or home server on a regular basis. Portable hard drives like the Western Digital Passport Elite make it easy to back up your data on the road.

Cover Your Keyboard

Keep liquids away from laptops at all times. That rule often gets broken, of course, and accidents happen. Should that accident end up on your laptop's keyboard, however, you could end up with more than just a mess: Liquids that seep through your notebook's keys can fry its components. Protect your notebook from spills with a custom-built, plastic keyboard cover from ProtecT Laptop Covers.

Buy a Bag

If you plan to carry your notebook with you, the most useful accessory you can buy is a laptop bag. They're available in a number of styles and prices; for maximum protection, we recommend investing in a model with a built-in padded sleeve. If you want something less conspicuous (thieves have been known to target obvious-looking laptop bags), cover your laptop in stand-alone sleeve and stow it in your backpack or briefcase.

Let It Accumulate

When you move your laptop from a cold to a warm environment, and vice versa, don't boot up until your system reaches room temperature. Sudden temperature changes can cause condensation to build up inside the notebook case; turn it on too quickly, and the moisture could damage

The Best Computer Tips and Tricks: Microsoft Office 2003

Edit Outlook E-mails with Word
Want to use Word to handle viewing and composing rich e-mail messages to send via Outlook? You can view inbound mail using Word by opening Outlook, clicking Tools > Options, and then selecting the Mail Format tab. Click the box next to "Use Microsoft Word 2003 to read Rich Text e-mail messages." Click the box above it to use Word to edit your e-mail messages. If you just want to use Word to create a single e-mail message, go to Actions > New Mail Message Using and then decide if you want to compose in an HTML or Word document (or even Excel spreadsheet) format.

AutoRecover in Excel

Don't let all your number-crunching go down the virtual drain if your system crashes. Tell Excel's AutoRecover feature to save your file automatically and at regular intervals by going to Tools > Customize and selecting the Save tab. Under Settings, check the box next to "Save AutoRecover info every . . ." and then select how often you want the information saved (anywhere from every minute to every 120 minutes). You can also change the AutoRecover save location.

Simplify Hyperlinks

If you hate having to hit the Ctrl key along with clicking on a hyperlink when you want to go to a Web site listed in a Word document, you can save yourself the extra keystroke by heading to Tools > Options and selecting the Edit tab. Then uncheck the box that says "Use CTRL + click to follow hyperlink."

Change from 1st to 1st

Not everyone wants a superscript when they type in "1st" or other ordinal numbers. If that includes you, select Format > AutoFormat and click the Options button. Under the "AutoFormat as You Type" tab, uncheck the box next to "Ordinals (1st) with superscript" that's in the section labeled "Replace as you type." The same section allows you to stop Word from automatically replacing Web and e-mail addresses with hyperlinks.

Configure AutoCorrect

You can program AutoCorrect to automatically change text to the format you prefer. If you use copyright and trademark symbols often, head to Tools > AutoCorrect Options > AutoCorrect tab, then highlight the text that Word will automatically convert to the symbol (like "(tm)" for "™"). You will see the text you select pop up in the blank fields under the "Replace" and "With" headings, below "Replace text as you type" (the box next to it is checked by default). Now, any time you input that selected text, Word will instantly change it to the related symbol

The Best Computer Tips and Tricks: Microsoft Office 2007

View Documents as Drafts
One thing that annoys us about Word 2007 is that it doesn't automatically let you open a document in Draft view (which was the Normal view in earlier versions of Word). To enable this, click the Office button > Word Options > Advanced > General. Then click the box next to "Allow opening a document in Draft View."

Display Formatting Marks

Some people can live without Word's marks for spaces and paragraphs, but for those Word 2007 users who can't, go to the Office button > Word Options > Display. Then, under "Always show these formatting marks on the screen," check the box for spaces, paragraph marks, and more.

Show Page Breaks in Excel

Printing an Excel spreadsheet can be a hassle, but you don't need to go to Print Preview in order to see where a page breaks. Click the Office button, then under Excel Options, click Advanced. Under "Display options for this worksheet" click the box next to "Show page breaks."

Check Your Style

First, Word could check your spelling, and then your grammar; now it can even critique your writing style. If you're concerned about things like wordiness and improper use of the passive voice, have Word 2007 check for them. Click the Office button > Word Options > Proofing. Under Writing Style, select Grammar & Style from the dropdown. If there are particular areas you don't Word to scrutinize, click the adjacent Settings button and then uncheck the appropriate boxes.

Change Your Presentation's Resolution

With larger wide-screen displays becoming the PC-viewing norm, you might not want your PowerPoint presentation to go online formatted for an old-school 800x600 resolution. To bump up your presentation's optimal screen size, click the Office button > PowerPoint Options > Advanced. Under the General area, click Web Options, select the Pictures tab, and choose the screen size you want.

Revert to Old Office File Formats

The latest version of Office "grants" users new default file extensions that aren't compatible with previous versions; you're forced to download and install a plug-in. But if you want to make the old Office file formats your default ones, click Office, and then Options for the specific program you're in. Select Save in the left-hand column, and then under "Save documents," choose the old Office file extension from the pull-down menu next to "Save files in this format."

The Best Computer Tips and Tricks: Firefox 2

Redirect Search Results You can control where you see your search results. Type about:config into your location bar and find "browser.search.openintab", then double click to make it "true." Now when you use the search bar, your results will pop up in a separate tab instead of taking you away from your current page.

Disable Window Resizing

Web pages that resize windows drive some people up the wall. To fix that, go to Tools > Options, and open the Content tab. Click on the Advanced button next to "Enable JavaScript," then deselect the check box that allows scripts to "Move or resize existing windows."

Choose a Tab

As with IE, Ctrl+Tab will let you cycle through open tabs in Firefox. But if you want to go to a specific tab without using the mouse, use the Ctrl key and the number of the tab's position—Ctrl+1, for example, will open the first tab, Ctrl+2 the second, and so on.

Browse Without a Mouse

Tired of using the mouse? Ctrl+L will move you to Firefox's location bar, while Ctrl+K will move you to the search bar. (When you're there, hold Ctrl and use the up or down arrow keys to toggle the default search engine.)

Open multiple sites at startup

If you want to open multiple Web sites when you start Firefox, go to Tools > Options. Under the Startup section on the Main tab, you'll see the Home Page field. Enter the sites you want to open in this manner:
www.computershopper.com | www.collegebuyingguide.com.

Mousing Around

Your mouse gives you more browsing control than you might think. If you have a scroll wheel button, clicking it on a hyperlink will open it up in a new tab, while clicking it on a tab will close it. If you hold down the Shift key while scrolling, you can move backward or forward through your browsing history.

Quickly Cross-reference

Ever found something in an online article you instantly wanted more information about? Search for that information easily by highlighting the text, dragging it to the search bar, and pressing Enter. Firefox will search for that text automatically.

Delete Inaccurate URLs

If you've ever mistyped a Web site's address and then seen your mistake pop up whenever you retype the site's name, just highlight the site in the history and press Shift+Delete to get rid of it for good.

Stay Stealthy

If you don't want sites to know where you're coming from, type about:config into the location bar and then find the network.http.sendRefererHeader record. Double click on it, and change the "2" value to "0" to prevent Web sites from seeing your referrer information.

Get More Viewing Space

Want to maximize the Web-site view in your browser window? Then make your icons smaller. Just go to View > Toolbars > Customize and check the box next to "Use Small Icons."

Quick URL Fill-in

If you type a site's address without the usual ".com" or "www" and press Ctrl+Enter, Firefox will fill in the rest of the URL for you.

Give Your Bookmarks Keywords

To assign a keyword to a bookmark, simply right-click on it and select Properties. Write a word in the keyword field, and now when you type the word into the location bar, you'll automatically go to that site.

Curb Firefox's RAM Appetite

Firefox was once famous for how light it was on system resources. With each new update, however, it seems be become a bigger and bigger memory hog. Rein Firefox in a little by limiting the amount of memory it uses. Type about:config in the address bar and locate "browser.cache.disk.capacity." Normally, it's set to "50000," but you can lower that number if you find Firefox is using too much system memory.

Cleaner Google File Searches

Searching for multimedia files on Google can result in a lot of spammy results. An effective—if clunky—way to minimize getting such results is to type intitle:"index.of"(xxx|yyy)zzzz -html -htm -php into the search bar, where "xxx|yyy" are the types of files you want to find (such as "mp3|avi") and "zzzz" being the name of the files you want to find.

The Best Computer Tips and Tricks: Internet Explorer 7

Disable Plug-ins
If IE runs too slowly, or if it freezes up on you a lot, try disabling some of its preinstalled add-ons. Click Tools > Manage Add-ons > Enable or Disable Add-ons to see which add-ons are enabled. Select an add-on you don't want preinstalled, then click the Disable radio button under Settings to deactivate it.

Open Multiple Web Sites

Want IE to open two or more tabs when you start it up? Go to Tools > Internet Options, then type as many addresses as you want (on individual lines) in the "Home page" field.

Change Text Size

Hold the Ctrl key and roll the mouse wheel to change Web pages' text size: Rolling up makes it smaller, rolling down makes it bigger.

Tab Shortcuts

Hit Ctrl+T to open a tab so you can visit a new site without opening a new window; browse opened tabs without taking your hands off the keyboard by hitting Ctrl+Tab.

Create a Favorites Group

Want to group like-minded favorites in folders? Open new tabs to all the sites, then select "Add Tab Group to Favorites" under the Favorites menu, and then give the group a name. Now, when you go to the Favorites menu, just click on the folder to see all the related sites in one convenient place.

Redirect Pop-ups

Pop-ups usually open in a new window, but you can instruct IE to open them in a new tab instead. Go to Tools > Internet Options, and under the General tab, select Settings in the Tab section. Under "When a pop-up is encountered:" click the radio button labeled "Always open pop-ups in a new tab."

Scrub Browser Cache

If you don't want your temporary files hanging around, you can instruct IE to delete them automatically every time you exit the browser. Go to Tools > Internet Options and open the Advanced tab. Scroll down to the Security section, then click the checkbox next to "Empty Temporary Internet Files folder when browser is closed."

Mouse-free Browsing

You don't need a mouse to surf the Web—many functions can be performed just with the keyboard. Hitting F11 will shift the browser into full-screen mode (and back again). Ctrl+E will move the text-entry cursor to the LiveSearch box. Hit Ctrl+D to instantly add the current site to your Favorites, and Alt+D to move you automatically to the location bar.

Disable Sounds in Web Pages

If you prefer your own digital music collection to the soundtracks to be found on some Web sites, you can tell IE to keep them quiet. Go to Tools > Internet Options and open the Advanced tab. Scroll down to the Multimedia section, and deselect the check box next to "Play sounds in web pages."

142 Great Shortcuts to Speed Up Your PC

Control Inactive System Tray Icons
You don't have to hide or show all the icons in your system tray—you can control their disappearing acts. Right-click on the taskbar and select Properties. Click on the checkbox next to "Hide inactive icons" (if it's not checked by default), then click on the Customize button. For each item on this list, you can choose "Hide when inactive," "Always hide," or "Always show" options to decide what you'll see and when.

Fit More Icons on Your Desktop

If your screen is so cluttered with Word documents and program shortcuts that you can't see the rolling meadows of your wallpaper, you don't need to move piles of stuff to the Recycling Bin. Just change the amount of space between icons. Right-click on the desktop, select Properties, then click on the Appearance tab, and click the Advanced button. In the "Item" drop-down, scroll down to Icon Spacing (Horizontal) and Icon Spacing (Vertical); changing the value in the "Size" field will move icons closer together (while increasing the number will move them farther apart). When you're done, click OK. To make your existing icons follow these rules, right-click on the desktop, select "Arrange Icons By" and then click Align to Grid, then go back to the same menu and click "Auto Arrange."

Shut Down from Your Desktop

If you're trying to eliminate every extraneous mouse click, you can shut down your computer with an icon on the desktop. Right-click on your desktop, click "New," and then click "Shortcut." In the "Type the location of the item" field, type "shutdown -s -t 00" to give you a way to shut down the computer immediately. (Change the -s to -r to create a reboot shortcut instead.)

Change What Programs Start When Windows Does

You can prevent a lot of apps forcing Windows into chilled-molasses boot times—without uninstalling anything. Click Start, then "Run...," and type msconfig. This brings up the System Configuration Utility window. Click on the Startup tab to see a list of all the apps slated to start when you boot up Windows. Click the check mark next to any you don't want, and then click OK to save your choices.

Type With an Onscreen Keyboard

Whether you have trouble with your hands or you just prefer using the mouse, typing with Windows' onscreen keyboard can be a great convenience. Navigate to Start > All Programs > Accessories > Accessibility, and click "On-Screen Keyboard." Click OK to clear the dialogue box and then start "typing"—you can even change the settings to "press" keys just by hovering your mouse over the letter you want (enable this feature by selecting "Typing Mode" from the Settings menu).

No-wait Screen Savers

Don't want to wait for your screen saver to kick in? Create a shortcut to it just as you would for any other program by hitting Windows key + F to search your computer and click on "All files and folders." Type "*.scr" in the "All or part of the file name" field to find every screen saver file on your computer. In the resulting list, right-click and drag the screen saver you want to your desktop. Whenever you want it to start, just double-click its icon.

Create Ghost Bootable SD Card or USB Flash Drive

It's a good practice to create an image of your hard drive before you start using it. Especially when you had to build that computer from scratch and spent hours installing the operating system and all of your favorite apps...

As Symantec Ghost becomes more user friendly, people start to recognize this idea. The idea also works well when you need to clean your PC from viruses. In case anything goes wrong with the operating system, you just need to restore the image using the Symantec bootable CD.

However, the problem comes when we deal with the new version of those small laptops: The netbooks! which usually don't come with a built-in CD-ROM drive to bootup the PC.
The most simple solution would be buying an external CD-ROM drive, which costs you money. And in some cases, you just want to bootup the Symantec Ghost.... with whatever available!


The good news: Almost every recent laptop/netbook comes with a card reader, and even if you wasn't lucky enough, your laptop/netbook should have a USB port!

This guide will tell you how to create a bootable SD card or a USB flash drive with Symantec Norton Ghost.
This task can be done with several different versions of Symantec Ghost; however, the steps from this articles are based on Symantec Ghost 14.


What you need?
  • Symantec Ghost 14 bootable CD. (Some other versions might also work)
  • A PC with bootable CD/DVD drive.
  • An SD card (either SD or SDHC), or a USB thumb drive. The size can be as minimum as 1 GB. You can also pick a large SD card if you want to store your hard drive image to the card as well.
  • An SD slot or a card reader (for SD card) or a USB slot (for thumb drive)


Follow the steps in order. Use this guide at your own risks.


  1. First, check to make sure your CD/DVD drive is bootable. (See your BIOS manual or PC user guide for details since this is out of the scope of this article).
  2. - For SD card: Make sure the SD slot or the card reader is available. if it's a card reader, connect it to the PC. Also insert the card.
    - For USB thumb drive: Make sure the drive is inserted into one of the USB slots.
  3. Bootup the computer using the Symantec Ghost CD (Details vary on different computers). On Windows XP, during the startup, you should see the prompt "Press any key to boot from CD...".
  4. Once the Symantec Recovery startup is complete, you should see the main screen of Symantec Ghost 14 Recovery similar to this image:


  5. Select "Analyze" from the left menu.


  6. Then click on "Open Command Shell Window". A command prompt window will display.

  7. At this command prompt window, type: "diskpart" (one word, without quotes) and hit enter. The prompt now changed to "DISKPART>"

  8. Now type "list disk" and hit enter. You should now see a list of all available disks. Base on the size of each disk listed, find the one that matching your SD card (or thumb drive) and note its disk number under "Disk ###". If you don't see your SD card (or flash drive) listed, verify if it is inserted or plugged in (you might need to restart the computer and try again).

  9. Type "select disk <n>" (replace <n> with the disk # noted from the previous step) then hit enter.
    Important!! Besure to select the correct disk (your SD card or thumb drive) as you will be erasing the drive.
    Sample image with a 4-GB SD selected:


  10. Create a primary partition for the the disk by executing the following sequence of commands:
    clean
    create partition primary
    select partition 1

  11. Set the primary partition active, type: "active" and hit enter

  12. Perform a quick format with the following command:
    format fs=fat32 quick

  13. Then type:
    assign
    exit

  14. Your SD card (or the flash drive) is now bootable and will act similar to a local hard drive. In order to boot this card with Symantect Ghost Recovery, copy all contents from the Symantec Ghost disc to the SD card (or the flash drive). Besure to copy everything including any hidden files/folders.

    The SD card or flash drive is now bootable and will boot your laptop/netbook to Symantec Ghost Recovery utilities exactly the same way as of the CD (To boot with the card on your laptop/netbook, don't forget to set your bios to search for the SD card or USB external devices in the boot sequence).

The Best Computer Tips and Tricks: Windows XP

Control Inactive System Tray Icons
You don't have to hide or show all the icons in your system tray—you can control their disappearing acts. Right-click on the taskbar and select Properties. Click on the checkbox next to "Hide inactive icons" (if it's not checked by default), then click on the Customize button. For each item on this list, you can choose "Hide when inactive," "Always hide," or "Always show" options to decide what you'll see and when.

Fit More Icons on Your Desktop

If your screen is so cluttered with Word documents and program shortcuts that you can't see the rolling meadows of your wallpaper, you don't need to move piles of stuff to the Recycling Bin. Just change the amount of space between icons. Right-click on the desktop, select Properties, then click on the Appearance tab, and click the Advanced button. In the "Item" drop-down, scroll down to Icon Spacing (Horizontal) and Icon Spacing (Vertical); changing the value in the "Size" field will move icons closer together (while increasing the number will move them farther apart). When you're done, click OK. To make your existing icons follow these rules, right-click on the desktop, select "Arrange Icons By" and then click Align to Grid, then go back to the same menu and click "Auto Arrange."

Shut Down from Your Desktop

If you're trying to eliminate every extraneous mouse click, you can shut down your computer with an icon on the desktop. Right-click on your desktop, click "New," and then click "Shortcut." In the "Type the location of the item" field, type "shutdown -s -t 00" to give you a way to shut down the computer immediately. (Change the -s to -r to create a reboot shortcut instead.)

Change What Programs Start When Windows Does

You can prevent a lot of apps forcing Windows into chilled-molasses boot times—without uninstalling anything. Click Start, then "Run...," and type msconfig. This brings up the System Configuration Utility window. Click on the Startup tab to see a list of all the apps slated to start when you boot up Windows. Click the check mark next to any you don't want, and then click OK to save your choices.

Type With an Onscreen Keyboard

Whether you have trouble with your hands or you just prefer using the mouse, typing with Windows' onscreen keyboard can be a great convenience. Navigate to Start > All Programs > Accessories > Accessibility, and click "On-Screen Keyboard." Click OK to clear the dialogue box and then start "typing"—you can even change the settings to "press" keys just by hovering your mouse over the letter you want (enable this feature by selecting "Typing Mode" from the Settings menu).

No-wait Screen Savers

Don't want to wait for your screen saver to kick in? Create a shortcut to it just as you would for any other program by hitting Windows key + F to search your computer and click on "All files and folders." Type "*.scr" in the "All or part of the file name" field to find every screen saver file on your computer. In the resulting list, right-click and drag the screen saver you want to your desktop. Whenever you want it to start, just double-click its icon.

9 Computer (PC) Tricks You Should Try Right Now


Computers have simplified our life to a great extent. Things that were impossible earlier can now be completed instantly thanks to computers. But, does this mean that a PC is all work and no play?

Obviously not! Here are some of the best tricks you can try out on your Windows based computer.

Computer Tricks
1) Make your computer speak what you type
You can use your PC's built in features and some VBScript magic to create a simple program that will make your computer speak whatever you input to it. What are you waiting for? Head over to this post to start a conversation.

2) Find your computer's gender
Want to know if your PC is male or female? Simple. Try the previous trick to know if your computer is a 'he' or a 'she'.

On a serious note, this depends upon the voice you have selected in Microsoft Text to Speech options.

3) Lock Folders with password
Do you often have other people seeing your personal files? You can store them in a password protected folder so that only you can access them. Go see this post to know how to protect your personal files effectively.

4) Make your computer greet you every time you start Windows
A simple modification in the first trick will let you have an awesome computer said welcome that you can use to impress all your friends. Just read this post to make your computer welcome you in its own mechanical voice.

5) Have fun with the Notepad
PC Tricks
If you think that Notepad is just a basic text editor, then my friend, you are horribly wrong. You can use Notepad to create everything from a personalized log to harmless viruses that are incredibly annoying. Go see this post to know just how useful Notepad is.

6) Command Prompt too has some tricks up its sleeves
So, you thought that Notepad has some tricks but not the Command prompt? If you thought so, then you would be surprised to see the amount of fun you can have from the Windows Command Prompt. Just see this post to get impressed.

7) Change your Processor's name
Are you bored of your old processor and want a new one with a staggering name? Change its name to something extraordinary to get that something special for your PC.

8) Make a Keyboard Disco
Use some VBScript coding to create a live disco using the LED keys on your keyboard. See this post to know how your keyboard can turn into a disco.

9) Use your Keyboard as Mouse.
You know you can use your mouse as keyboard using the On-screen keyboard. What if I tell you that it is also possible to do the reverse? Just read post to see how.